
Sometimes it is preferable to have a web URL redirect a mobile user to an app instead of the default web browser– this is known generally as deep linking. In this post we describe the process for implementing a means of deep linking on Android, known as app linking, that streamlines this process for the user and ensures that your mobile users are directed to only your app for any URL you specify.
Android app linking can be used to enhance the user experience by taking users directly into the appropriate location in your app when they navigate to your website on their mobile device. The process for implementing this is very similar to that for implementing deep links with only slight procedural differences.
Deep Linking
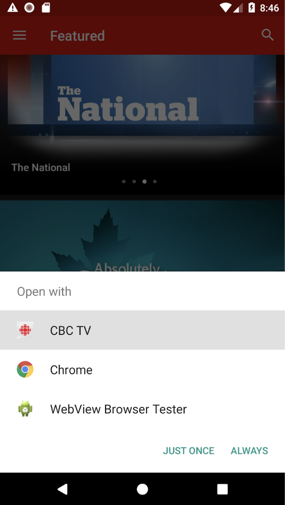
In Android, any app can “sign up” to receive links from any URL. In the absence of an official association between the web domain and the app, the user will be presented with a disambiguation dialog showing all of the installed apps that are signed up to receive links to the specified URL:
Also in the absence of an official association between your app and web domain, anyone can sign up to receive VIEW intents to your website. This association is important because without it, a competitor could put an intent filter in their manifest with your domain as the host and show up right next to your app in this dialog.
App Linking
App linking in Android is the solution to both of these problems. It allows users to skip this dialog, and also prevent other applications from hijacking your users. Additionally, it provides support for Instant Apps, where users can use your application without installing it. It also makes app content searchable by Google, allowing users to open specific content in your app through Google search results. App linking specifically requires three components:
- Intent filters in your AndroidManifest.xml that define the URLs that will link into your application and instruct Android to automatically verify the association between your app and website
- Logic within the activity or activities that will be be handling these links
- A file hosted on your website that will securely associate your website with your application
Defining Intent Filters
In Android, apps can “sign-up” to receive implicit intents through one or more activities, services or broadcast receivers. This is done by specifying an intent filter with the appropriate details for the intent in the app’s AndroidManifest.xml file. In the case of deep linking, you probably want to put the intent filter(s) within a single activity, typically the one that launches your app or an activity that is dedicated to receiving deep links and dispatching navigation to the appropriate location in the app. This allows centralization of intent filters within a single activity in the manifest, as well as logic regarding link verification and mapping.
Furthermore, in the Principles of Navigation, Google specifies that when a user deep links to a location in your app, the navigation stack should be the same as if they had navigated there manually. Centralizing this logic will facilitate fulfilling this requirement.
If you are using Navigation Architecture Components to define your app’s navigation, the definition of intent filters for deep links will happen automatically. Just be sure to set “auto verify” when creating the deep link.
Handle Links within Application
Inside any activity you have specified the intent filter for, you can get the URL via the Intent that launched the activity.
Whether you need this information and what exactly to do with it, is going to vary with every application. In simple applications, it may be enough to simply start the corresponding activity. However, in practice with large applications or those with complex navigation, implementing this link handling will be the most complex and time consuming step in the process.
Associate App and Website
Making the association between your app and website revolves around creating and hosting a file on your website that contains the fingerprint for the certificate used to sign the application. This is further evidence that same entity controls both the website and the application.
A json file (assetlinks.json) must be created that includes the app package name and the SHA-256 fingerprints of the certificate used to sign any build configuration you want to use or test against the domain following the format defined here.
You can get the SHA-256 fingerprints using the following command: keytool -list -v -keystore my-release-key.keystore
Alternatively, the “app links assistant” in Android Studio (found under “Tools”) will generate the assetlinks.json file for you for a single signing configuration and app.
An example that includes fingerprints for two different build configurations is as follows:
Place the file at https://<domain>/.well-known/assetlinks.json for all domains you want to associate with the app.
Verify The Association
Google provides a simple api for testing the veracity of your assetlinks.json file. Simply construct a url like this:
Where domain.name is replaced with your domain (which must be accessible by Google’s servers). Example:
A successful query will return a json file with statement elements corresponding to each association defined along with a “debugString” element. This will indicate any issues with the association. A successful association should return “None” in the Errors section of the “debugString” element.
Installing or upgrading the app on a mobile device or emulator should result in the OS automatically attempting to make the association. You can monitor this in LogCat. Make sure to select “No Filters” and type “IntentFilter” in the search box. You should see something like this for a successful verification:
The following output indicates a failed association, and unfortunately, doesn’t provide any information for debugging the failure. Note the highlighted “Failed hosts” section:
An ‘adb’ command will provide details on all associations on the device:
Result:
In practice, the only tool available for debugging the app association process is the web api described above.
As you can gather from these careful steps, app linking can potentially be a seamless option for clients. Hopefully, this insight can simplify the process of implementing app linking for you and your team.
